yashuop
HA: ISRO Vulnhub Walkthrough
CTF challenge called “HA: ISRO” We have developed this lab for the purpose of online penetration practices.full download from herePenetration Methodologies
Enumeration
With the help of help scan, we now know that port number 22, 80 are open with the service of SSH, HTTP respectively. Now that port 80 is open we open the target IP address in our browser as shown in the following image:1 http://192.168.1.104
2 http://192.168.1.104/bhaskara.html
we have the Bhaskara Launch Code.
the combination of the echo command and the base64 -d. echo “L2JoYXNrYXJh” 1 base64 -d After decoding the base64 encoded text we get “/bhaskara”. This seems a hint that there might be a directory named bhaskara.
Now in order to crack this file, we are going to use extract its hash using the true.py. You can download the true.py We named the file as true.py and ran it and it gave us the password as xavier. python true.py bhaskara > hashesjohn hashes –show
Now as we knew it was a TrueCrypt file. That means it might be hiding something inside it. So, we tried to open it using VeraCrypt by providing it path and selecting a volume as shown in the given image.
It opened up to show a text file labelled ‘flag.txt’. We opened it; it gave us our first flag. Bhaskara Flag.
Bhaskara Flag: {b7bb88578a70970b9be45ac8630b6f9d}
Now let’s move forward in Enumeration. We also performed a directory scan. This gave us an /img directory. We performed an extension directory scan. It gave us a connect.php.
/img directory. Here we found an image called aryabhata.jpg.
We will download the aryabhata.jpg and opened it.
Upon opening it we found it to be the poster for Aryabhata satellite as shown in the image given below.
As we couldn’t find anything specific with the image, we suspected that there is some steganography involved. Hence, we decided to use the Steghide tool to extract anything that might be hidden in the image. We saw that there is a text file named flag.txt hidden inside it. On opening it we found the Aryabhata flag.
Aryabhata Flag:{e39cf1cbb00f09141259768b6d4c63fb}
Exploitation
Back to the Web Browser, we also found a connect.php in our drib directory bruteforce. This gave us nothing. Then we realized that this can be command injection. Now to test we tried opening the etc/passwd file through it. As seen in the image given below, we see that it’s a File Inclusion Vulnerability.
We edited our shell.php, to enter the attacker machine IP address. And then closed the file after saving it. Now we need to send this to the target machine. Hence, we started a python http server using the one-liner showed below.
We are gonna capture a reverse connection using the netcat. So we need to initiate a listener on the port mentioned in the shell file.
After starting the listener on the target machine, we will run the shell on the target machine using the File Inclusion Vulnerability.
Upon execution, the shell gave us a session to the target machine. As seen in the image given below, it wasn’t a proper shell. So, we needed a python one liner to convert it into a proper shell.
netstat command to check for the IP address and ports the target machine is listening on and found that a web service (3306) is allowed for localhost only. The most common service to run on the port 3306 is MySQL. Let’s enumerate in that direction.
login in the MySQL database as the root user. After logging in the MySQL, we enumerated the databases. Here we found a database named ‘flag’. the tables of flag database. Here we found our second flag Mangalyaan Flag.
Mangalyaan Flag:{d8a7f803e36f1c84e277009bf2c0f435}
Privilege Escalation
As a part of our Enumeration for Escalating Privilege on the target machine, we try to find if the /etc/passwd is writable. We can see that the file is, in fact, writable. This is our way to move forward.
the password hash for the user that we are going to create on the target machine by making an entry in the /etc/passwd file. We are going to use the openssl to generate a salted hash.
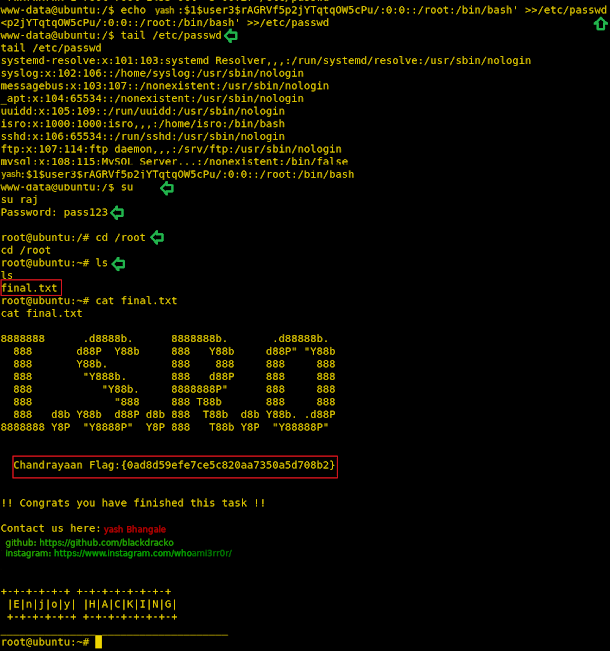
Now back to our remote shell on the target machine. Here we are going to use the hash that we generated in the previous step and make a user yash which has the elevated privilege. We used the echo command to make an entry in the /etc/passwd file. After making an entry we checked the entry using the tail command. Now, all we got to do is run su command with the user name we just created and enter the password and we have the root shell. traversed inside the root directory to find our final flag, Chandrayaan Flag.
Chandrayaan Flag:{0ad8d59efe7ce5c820aa7350a5d708b2}
full download from here
\yash bhangale
student of class 11th

yashuop
explorer